In my last post about NanoStation 2, I added 2 ways to reset M2 to default settings. This procedure is similar to Ubiquiti M5 Station. But what to do if you can’t reset both methods? This answer will be on a 3rd way.
The first way to reset Nanostation M5:
- Connect your M5 to pc or notebook and enter this IP address on the browser:
- 192.168.1.20 — This is Nanostation m5 default IP or the other one you set.
- Enter login and pass (by default ubnt) or own one if you change it early.
- Choose “SYSTEM” at the menu
- Press “Reset to Default“.
- Then just wait.
Second way:
We recommend doing it when you forgot your password or can’t connect to Nanostation via WEB.
- Connect it to pc or notebook and turn it on.
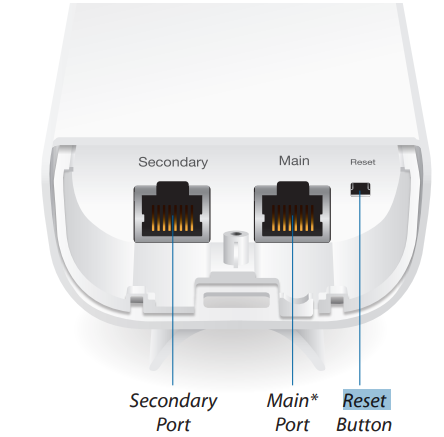
- Press and Hold “Reset” near the main LAN port and wait 8-15 seconds.
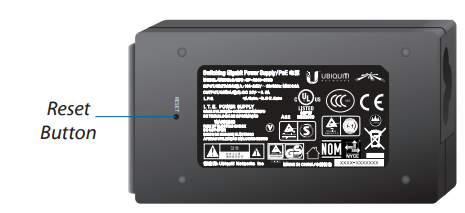
- On some devices the reset button on POE
- When done you will see all indications lamps will blink a few times.


If after resetting you can’t connect to Nanostation m5 you need to do this:
- check cable connector (anyway)
- Set the LAN IP (ipv4) to 192.168.1.21 subnet mask 255.255.255.0
default gateway 192.168.1.20 (where to do it? > connection setting > TCP/IPv4 )
The third way to Nanostation m5 reset
There are cases when Ubiquiti hardware needs to be restored after unsuccessful flashing, or the device is constantly rebooted after an incorrect WatchDog setup.
Some installers may disable the Reset button in Ubiquiti’s settings so that you cannot reset the device to factory settings and enter its settings. This article will help you in such situations.
This manual is universal and suitable for restoring AirOS in AirGrid, Bullet, NanoStation, NanoBridge, Loco, Rocket, PowerBridge, PicoStation, Nanobeam, Litebeam, Rocket, etc…
To restore AirOS firmware on Ubiquiti devices, we will need:
- the Ubiquiti device to be recovered;
- a paper clip, match, or any other item that you can press the Reset button with;
- two patch charts;
- computer or notebook;
- program tftp2;
- factory firmware for your device downloaded from the official website https://www.ubnt.com/download
Restore Ubiquiti firmware in Windows
- Disconnect the Ubiquiti device from the power supply;
Configure on the NIC of your computer the IP address: 192.168.1.254 and the Subnet Mask: 255.255.255.0. - Connect the device to your computer
- Click and hold the Reset button on your Ubiquiti device;
Turn the power on the device and wait about 10 seconds for the LEDs to start flashing alternately. Then release the Reset button. - Check that the device is pinging. To do this, open the Windows Start menu and enter the command cmd
- In the resulting black window, enter the command ping 192.168.1.20.
- Download and run the program tftp2;
- In the Server, field enters the IP address 192.168.1.20, press the button… button in the Server field, and specify the firmware file. After that press the Upgrade button and wait for about 7-10 minutes while the firmware is running.
- Attention! Do not turn off, reboot, or unplug the device from the power supply during the flashing process as these actions can damage the device!
Restore Ubiquiti firmware on Linux
Usually, in Linux operating systems, the TFTP program is already present. If there is no TFTP then you have to install it. In Ubuntu, this is done with the command Sudo apt-get install TFTP.
To firmware the Ubiquiti device run the following commands in the terminal:
root@ubuntu: tftp 192.168.1.20
tftp> bin
tftp> trace
tftp> put XM-v5.5.2.build14175.bin
Sent 6736122 bytes in 120.6 seconds
tftp> quit